How to install VLC on Fedora X Y Z
Some of you who recently switched to linux or who are planning to switch to linux, are may be looking for a good media player which will play every thing on Linux, or looking for how to install VLC, This post is a step to step guide about installing VLC on Fedora 12/13/14
So, just follow the steps or copy - paste them to install vlc on your machine. It does not matter what architecture you are using - x86_64 or i686 or i386
Step 1:
$su -c 'yum localinstall --nogpgcheck http://download1.rpmfusion.org/free/fedora/rpmfusion-free-release-stable.noarch.rpm http://download1.rpmfusion.org/nonfree/fedora/rpmfusion-nonfree-release-stable.noarch.rpm'
Step 2: now run
$su -c 'yum clean all'
Step 3: $su -c 'yum install vlc'
All set to go. VlC is installed successfully.
Just make me know if you get some error.
Friday, December 10, 2010
Monday, November 29, 2010
Skype in Fedora 14 X64

As we know, there is no Skype 64bit available,
So here we use i686 packages to install skype in 64bit.
Our current system is :
[LINUX@fedora-home ~]$ uname -a
Output:
Linux fedora-home 2.6.35.6-48.fc14.x86_64 #1 SMP Mon Nov 29 15:36:08
UTC 2010 x86_64 x86_64 x86_64 GNU/LinuxTo install Skype 32 bit in a 64 bit system we need to install some dependencies using yum:
yum install libXv.i686 libXScrnSaver.i686 qt.i686 qt-x11.i686
pulseaudio-libs.i686 pulseaudio-libs-glib2.i686
alsa-plugins-pulseaudio.i686 -yNow download Skype from official website and install the rpm package
rpm -ivh skype-2.1.0.81-fc10.i586.rpmAnd now
Njoy SKYPE
Saturday, October 16, 2010
OS in Virtual Box on LINUX
How to install any Os in Virtual Box on linux ?
//To install operating system on virtual box just like a nested class
the procedure of installing operating system on virtual box which is installed on linux or windows both are nearly similar. There are many advantages of using Virtual Box like you dont have to use dual boot, you can play windows games on linux, you can test any OS with out really installing it, and some GEEKY reason: you can install an OS which doesnot support your current configuration so that you can use some specific version of any tool for example if you want to try ns1.xx then you will like to go for fedora core 4 or some thing like that for hastle free installation so try Virtual Box and many more. Here are the steps for installing any OS in Virtual Box, I am user of fedora but they are applicable to all the other distribution.
Step 1. Installed virtual box on linux machine (steps are mentioned in this post)
2. Iso image of windows xp or any other linux distro or any other version on windows which u want to install
Now the installation steps are as follows:
1. start virtual box
on fedora
>application>system tools>virtual box
2.After starting the Virtual box
below screen is shown
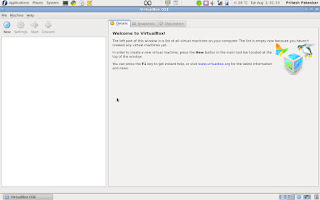
then click on New option as shown
on clicking the new option you get the popup windoe of create New Virtual Machine
on this click on next button . .

3. after clicking the next button
Give the name to the installation and select the OS type and the respective version for the installation

and select next
Now time to allcoate memory
here the main memory(RAM) allocation
allocate it with your requirement (minimun 256 MB)

and select next
4. After step 3
select create new hard disk in Boot Hard Disk(Primary Master)

and select next

and if you not get any error then again . select next.
5. Select the type of virtual hard disk you waqnt to create.

between Dynamically expanding or Fixed-size Storage and select next.
6.Virtual Disk Locaion and Size
Press The Select button to select the location of a file to store the hard disk data or type a file name in the entry fild.

and click next.
7.
After this you are going to create a new virtual hard disk by clicking Finish.

8.you are going to create a new virtual machine by press the finish button

Now the pop up window will close after pressing the finish button

9. select the OS which is shown in left pannel and then select the setting of it.
And configure as shown in Image.
GENERAL

SYSTEM
DISPLAY
STORAGE

In the Storage tree select "Empty"
After this in Attributes section CD/DVD Device select the "oprn virtual Media MAnager"
New pop up window will open in this select the "Add" and add the Browse the .iso image. and


10. After this start the virtual OS
now the simple way of installing the windows XP or that u are installing
follow the simple OS installing steps.


After installation the OS. Njoy the virtual OS on your LINUX Distro.
One more thing, usually you do not need to install any additional driver after installing Windows Xp as they are built in virtual box. For rest , it varies from OS to OS.
Thursday, August 19, 2010
Enable proxy on opensuse 11.3
Configure the proxy in Opensuse to be able to use zypper,Yast . .
 To configure proxy open terminal and type this command to edit proxy file
Then add these lines
After adding these file save it
and then exit
and reboot your machine
Yast and zypper are working now behind the proxy.
Njoy :)
 To configure proxy open terminal and type this command to edit proxy file
 nano /etc/sysconfig/proxyThen add these lines
  PROXY_ENABLED="yes"
  HTTP_PROXY="http://proxyhost:port"
  FTP_PROXY="http://proxy-host.com:port"
  HTTPS_PROXY="http://proxy-host:port"
If you are using a username and password for your proxy make the above lines looks like this
HTTP_PROXY="http://user:password@proxyhost:port"After adding these file save it
and then exit
and reboot your machine
Yast and zypper are working now behind the proxy.
Njoy :)
Tuesday, August 3, 2010
Install VirtualBox on Fedora 13
This is a steps tutorial on how to get VirtualBox up and running on Fedora 13.
The folks at VirtualBox have made it easy to install for Fedora users and I’m going to show you how in a few easy steps. Right, open a terminal window and let’s get to it…
su -- Get the VirtualBox repo installed
wget http://download.virtualbox.org/virtualbox/rpm/fedora/virtualbox.repo && cp virtualbox.repo /etc/yum.repos.d/
- Install VirtualBox
yum install -y VirtualBox*
- Run the setup file for VirtualBox:
/etc/init.d/vboxdrv setup
- Run, & Njoy!
VirtualBox
Saturday, May 22, 2010
DNS server settings on Fedora 12 & Fedora 13
If you are getting "Website not available" messages or the site is taking longer to load, its time you to use Google Public DNS settings to a Fast and Secure .
Google Public DNS is a free, global Domain Name System (DNS) resolution service, that you can use as an alternative to your current DNS provider.
To try it out Configure your network settings to use the IP addresses 8.8.8.8 and 8.8.4.4 as your DNS servers
Changing your DNS servers settings
Changing DNS server settings on Fedora 12 & Fedora 13
Open terminal..
Go to root by
[linux@pluto ~] $ su
Password:
Now time to make “resolv.conf” file on your machine by:
# gedit /etc/resolv.conf
If anynameserverlines appear, write down the IP addresses for future reference.
Replace thenameserverlines with, or add, the following lines:
nameserver 8.8.8.8
nameserver 8.8.4.4
Save and exit.
Restart any Internet clients you are using.
Njoy :)
Wednesday, April 28, 2010
Gnome Shell in Fedora 12 & 13
How to install Gnome Shell in Fedora 12 & 13
GNOME Shell is a component of GNOME 3.0, the next generation of the GNOME desktop environmentFor installing the Gnome shell you need to have two packages installed on your Fedora System
desktop-effects
gnome-shell.In case desktop-effects package is already installed, you need not do it again.Run this command in a terminal:
# yum install desktop-effects gnome-shell
After installation you can enable the Gnome Shell from
System > Preferences > Desktop Effects
as shown below:

Now Njoy GNOME SHELL :)
Friday, March 12, 2010
BSNL EVDO on Fedora 12
To Configure EVDO with fedora 12 or other linux you need...
First plug evdoThen open terminal$ suthen type# wvdialconfnow Modem configuration written to /etc/wvdial.conf.so to edit this type# gedit /etc/wvdial.confand Now add the following lines to your wvdial.conf[Dialer Defaults]Init2 = ATQ0 V1 E1 S0=0 &C1 &D2 +FCLASS=0Modem Type = Analog ModemPhone = #777ISDN = 0Username = <>
$ su
then type
# wvdialconf
now Modem configuration written to /etc/wvdial.conf.
so to edit this type
# gedit /etc/wvdial.conf
and Now add the following lines to your wvdial.conf
[Dialer Defaults]
Init2 = ATQ0 V1 E1 S0=0 &C1 &D2 +FCLASS=0
Modem Type = Analog Modem
Phone = #777
ISDN = 0
Username = <>
Init1 = ATZ
Password = <>
Modem = /dev/ttyUSB0
Baud = 9600
and then save it.
Now try the command
# wvdial
on your terminal as root.
njoy internet on your machine :)
Subscribe to:
Posts (Atom)